Creating a Visit
The Sales Executive can create a visit manually in several ways:
- via the create button in the Context "Visit",
- via the radius button in the preview of a visit (geographical proximity to this visit),
- via the Further Actions button in the preview of a company or contact,
- via the 360 Degree view of a company or contact, or
- via the Further Actions button of an existing appointment.
A manually created visit always receives the status "Planned".
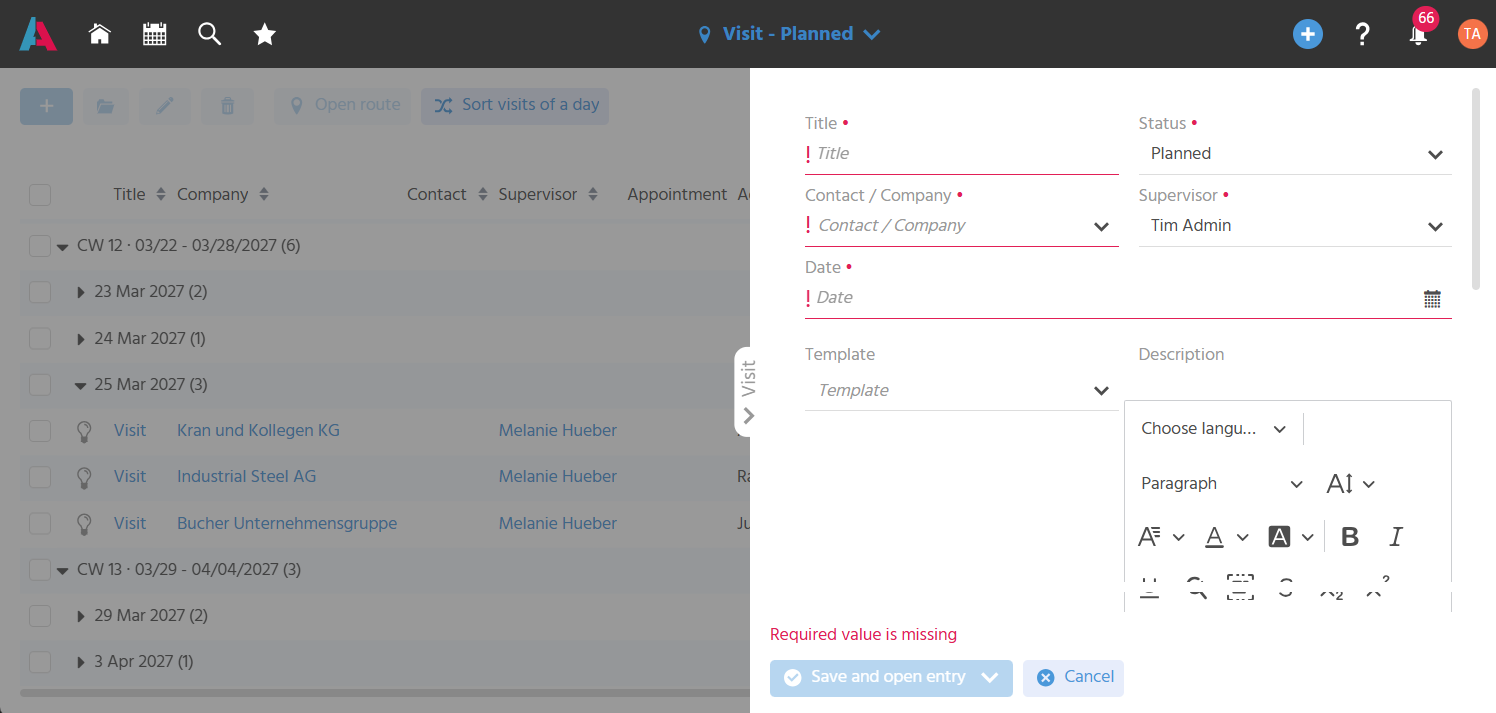
SmallEdit via the Create Button and from a Company or Contact
Creating a Title and Description
First, a title that is as meaningful as possible must be entered so that the visit can be clearly identified. Optionally, a description can also be entered to explain the purpose of the visit in more detail.
For visit recommendations, the title and the note in the "Description" field are created in the language stored in the supervisor record. If no language is stored, or if a language is stored for which no translation exists, the title and description are created in English.
Assigning a Company and Contact Person to the Visit
A company must be assigned so that it is clear whom the Sales Executive is visiting. Optionally, a contact person can also be assigned.
Capturing the Responsible Person
The supervisor must be assigned so that it is clear who conducts the visit and is responsible for it. Initially, the logged-in user is entered automatically, but the field is editable.
Entering the Planned Date
A date must also be entered so that the visit is scheduled. In the course of the visit preparation, the date can also be adjusted, or an appointment can be created that replaces the date.
Selecting a Template
A template can be selected so that visits follow a uniform structure and the Sales Executive is guided on which topics to address and which materials to bring or prepare.
Creating a Visit from an Appointment
A visit can be created from an existing appointment so that existing appointments can be integrated into a tour. The following data is taken over from the appointment:
- the subject of the appointment as the title of the visit
- the date and time of the appointment
- the company and contact person linked to the appointment
- the logged-in user as the supervisor
A visit can only ever be linked to one appointment. In the appointment, the link is shown in the "Connections" tab; in the visit, the link is shown in the preview. There, the date field is replaced by an appointment field if a link exists. When the visit takes place can then no longer be controlled via the visit, but only via the appointment.
The reverse is also possible: An appointment can be created from a visit, see "Creating a Linked Appointment".
Creating a Visit Based on Geographical Proximity
Visits can be created based on their geographical proximity to existing visits in order to plan tours with several visits efficiently. Upcoming and past visits are displayed so that you can decide whether it makes sense to create a visit for the current tour or not.
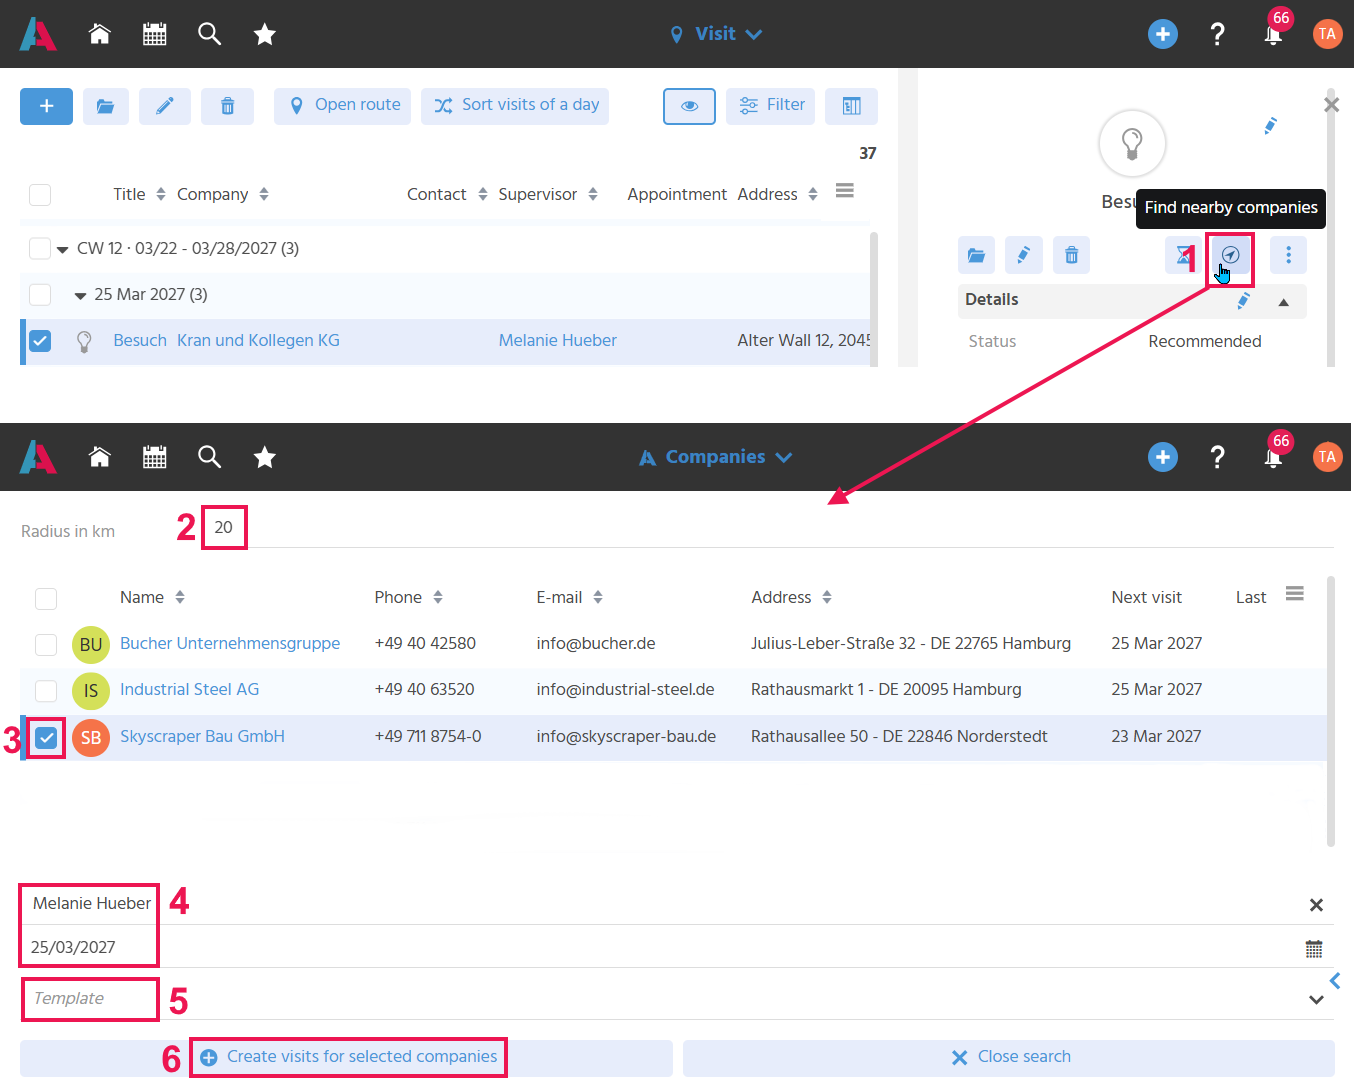
To do this, a visit is selected and the Action "Find Nearby Companies" is executed in the preview (1). The proximity search opens, in which you can enter the radius around the company of the initial visit within which the search is to be performed (2). From the companies in the result list, select those for which a visit is to be created (3). The supervisor and date have been taken over from the initial visit (4). A template can be selected, which is inserted into the description text of the visit (5). To create visits for the selected companies, the Action "Create Visits for Selected Companies" is executed (6). If no new visit is to be created, the Action "Close Search" is executed.
Keeping Track of Future Visits
The preview of a visit displays future visits so that, when an unscheduled visit is added, you become aware of existing visits and can take them into account accordingly.
Reasons for an unscheduled visit can be, for example:
- a problem at the customer's site that requires presence on site
- a specific need of the customer that you want to discuss in person
- etc.
If a future, already existing visit is displayed in the preview of the unscheduled visit, you can decide what to do with it. For example, you can leave it as planned because it is still to be conducted, or you can postpone it so that you are back in the regular visit frequency.